
Table of Contents
Creating Part Design Hole Standards
Update 11/3/2024
Just a quick clarification, the typedef defines the behavior of the standard, in this case the typedef only contains the Name and Main Diameter as a result these are the only affected fields in the Simple Hole Command when the Standard is applied. Notice that in the typeval I have all of the attributes defined, but the system is mart enough to only respect those previously defined by the typedef.
<?xml version="1.0" encoding="utf-8"?>
<std:node name="ASME Y.14 Simple Holes_standard" xmlns:std="http://www.dsweb.com/std">

  <std:typedef name="SimpleHoleValues">
    <std:strval name="Name">20mm Dia Basic Hole</std:strval>
	<std:floatval name="MainDiameter"></std:floatval>
  </std:typedef>

  <std:node name="Units">
    <std:node name="Length">
      <std:strval name="Length">mm</std:strval>
    </std:node>
    <std:node name="Angle">
      <std:strval name="Angle">deg</std:strval>
    </std:node>
  </std:node>

  <std:node name="SimpleHoleValues">
    <std:typeval name="SimpleHoleValues">
		<std:strval name="Name">20mm Dia Basic Hole</std:strval>
		<std:floatval name="MainDiameter">20</std:floatval>
		<std:floatval name="MainDepth">0</std:floatval>
		<std:floatval name="BottomAngle">0</std:floatval>
		<std:floatval name="ThreadDiameter">0</std:floatval>
		<std:floatval name="ThreadDepth">0</std:floatval>
		<std:floatval name="Pitch">0</std:floatval>
    </std:typeval>
  </std:node>
</std:node>
Introduction
When defining Holes, we have to key in values for all of the fields which can become very repetitive and even troublesome from human fallibility standpoint. Out of The Box there is a way to define sets of Standard Hole sizes for the Five Types of Holes; Simple, Tapered, Counter Bored, Counter Sunk and Counter Drilled. This will allow you to select a Standard from the dropdown menu in the Hole Definition dialogue window, which will automatically fill the values for Main Diameter, Depth, Counter Bore Diameter, Counter Bore Depth, Thread Pitch, Thread Diameter etc.

Folder Structure
You must store hole standards .xml files in separate directories under the following directory.
<Installation>\resources\standard
You must create the following directories under the standard directory.
- SimpleHole to store simple hole files.
- TaperedHole to store tapered hole files.
- CounterSunkHole to store countersunk hole.
- CounterDrilledHole to store counter drilled hole.
- CounterBoredHole to store counterbored hole.
XML Base Files
Simple Hole
- Description of the standard: Mandatory
- Main Hole diameter: Mandatory
- Main Hole Depth: Optional
- Bottom Angle: Optional
- Thread Diameter: Optional
- Thread Depth: Optional
- Pitch: Optional
- Thread Description: Optional
| Mandatory | Mandatory | Optional | Optional | Optional | Optional | Optional | Optional |
| Name | MainDiameter | MainDepth | BottomAngle | ThreadDiameter | ThreadDepth | Pitch | ThreadDescription |
| Sample1 | 10 | 20 | 120 | 11.8 | 10 | 1.25 | Sample1 |
| Sample2 | 13 | 10 | 110 | 14.2 | 10 | 2 | Sample2 |
Create a New XML file and paste this XML content into the new file, and save it to the SimpleHole directory.
<?xml version="1.0" ?>
<std:node name="S1_standard" xmlns:std="http://www.dsweb.com/std">
	<std:node name="Units">
		<std:node name="Length">
			<std:strval name="Length">mm</std:strval>
		</std:node>
		<std:node name="Angle">
			<std:strval name="Angle">deg</std:strval>
		</std:node>
	</std:node>
	<std:typedef name="SimpleHoleValues">
		<std:strval name="Name">S1</std:strval>
		<std:floatval name="MainDiameter">5.</std:floatval>
		<std:floatval name="MainDepth">10.</std:floatval>
		<std:floatval name="BottomAngle">110.</std:floatval>
		<std:floatval name="ThreadDiameter">6.</std:floatval>
		<std:floatval name="ThreadDepth">8.</std:floatval>
		<std:floatval name="Pitch">1.</std:floatval>
		<std:strval name="ThreadDescription">THD_S_01</std:strval>
	</std:typedef>
	<std:node name="SimpleHoleValues">
		<std:typeval name="SimpleHoleValues">
			<std:strval name="Name">S1</std:strval>
			<std:floatval name="MainDiameter">5.</std:floatval>
			<std:floatval name="MainDepth">10.</std:floatval>
			<std:floatval name="BottomAngle">105.</std:floatval>
			<std:floatval name="ThreadDiameter">6.</std:floatval>
			<std:floatval name="ThreadDepth">8.</std:floatval>
			<std:floatval name="Pitch">1.</std:floatval>
			<std:strval name="ThreadDescription">THD_S_01</std:strval>
		</std:typeval>
		<std:typeval name="SimpleHoleValues">
			<std:strval name="Name">STD_S_S2</std:strval>
			<std:floatval name="MainDiameter">6.</std:floatval>
			<std:floatval name="MainDepth">12.</std:floatval>
			<std:floatval name="BottomAngle">100.</std:floatval>
			<std:floatval name="ThreadDiameter">7.</std:floatval>
			<std:floatval name="ThreadDepth">10.</std:floatval>
			<std:floatval name="Pitch">1.05</std:floatval>
			<std:strval name="ThreadDescription">THD_S_02</std:strval>
		</std:typeval>
	</std:node>
</std:node>
Tapered Hole
- Description of the standard: Mandatory
- Main Hole diameter: Mandatory
- Tapered angle: Mandatory
- Anchor Point: Mandatory
- Note: If you set the Anchor Point value to 0, the anchor point is placed at the bottom of the hole. If you set the Anchor Point value to 1, the anchor point is placed at the top of the hole.
- Main Hole Depth: Optional
- Bottom Angle: Optional
- Thread Diameter: Optional
- Thread Depth: Optional
- Pitch: Optional
- Thread Description: Optional
| Mandatory | Mandatory | Mandatory | Mandatory | Optional | Optional | Optional | Optional | Optional | Optional |
| Name | MainDiameter | MainDepth | TaperedAngle | AnchorPoint | BottomAngle | ThreadDiameter | ThreadDepth | Pitch | ThreadDescription |
| Sample1 | 10 | 5 | 25 | 0 | 120 | 11.2 | 5 | 1.25 | Sample1 |
| Sample2 | 14 | 10 | 35 | 1 | 110 | 15.8 | 5 | 2 | Sample2 |
Create a New XML file and paste this XML content into the new file, and save it to the TaperedHole directory.
<?xml version="1.0" ?>
<std:node name="T1_standard" xmlns:std="http://www.dsweb.com/std">
	<std:node name="Units">
		<std:node name="Length">
			<std:strval name="Length">mm</std:strval>
		</std:node>
		<std:node name="Angle">
			<std:strval name="Angle">deg</std:strval>
		</std:node>
	</std:node>
	<std:typedef name="TaperedHoleValues">
		<std:strval name="Name">T1</std:strval>
		<std:floatval name="MainDiameter">5.0</std:floatval>
		<std:floatval name="MainDepth">10.</std:floatval>
		<std:floatval name="TaperedAngle">90.0</std:floatval>
		<std:intval name="AnchorPoint">0</std:intval>
		<std:floatval name="BottomAngle">110.0</std:floatval>
		<std:floatval name="ThreadDiameter">6.0</std:floatval>
		<std:floatval name="ThreadDepth">8.</std:floatval>
		<std:floatval name="Pitch">1.0</std:floatval>
		<std:strval name="ThreadDescription">THD_T_01</std:strval>
	</std:typedef>
	<std:node name="TaperedHoleValues">
		<std:typeval name="TaperedHoleValues">
			<std:strval name="Name">T1</std:strval>
			<std:floatval name="MainDepth">10.</std:floatval>
			<std:floatval name="MainDiameter">5.0</std:floatval>
			<std:floatval name="TaperedAngle">90.0</std:floatval>
			<std:intval name="AnchorPoint">0</std:intval>
			<std:floatval name="BottomAngle">100.0</std:floatval>
			<std:floatval name="ThreadDiameter">6.0</std:floatval>
			<std:floatval name="ThreadDepth">8.</std:floatval>
			<std:floatval name="Pitch">1.0</std:floatval>
			<std:strval name="ThreadDescription">THD_T_01</std:strval>
		</std:typeval>
		<std:typeval name="TaperedHoleValues">
			<std:strval name="Name">STD_T_2</std:strval>
			<std:floatval name="MainDiameter">6.0</std:floatval>
			<std:floatval name="MainDepth">12.</std:floatval>
			<std:floatval name="TaperedAngle">85.0</std:floatval>
			<std:intval name="AnchorPoint">0</std:intval>
			<std:floatval name="BottomAngle">105.0</std:floatval>
			<std:floatval name="ThreadDiameter">7.0</std:floatval>
			<std:floatval name="ThreadDepth">10.</std:floatval>
			<std:floatval name="Pitch">1.05</std:floatval>
			<std:strval name="ThreadDescription">THD_T_02</std:strval>
		</std:typeval>
	</std:node>
</std:node>
Countersunk Hole
- Description of the standard: Mandatory
- Main Hole diameter: Mandatory
- Counter Sunk Mode: Mandatory
- Notes:
- If you set Counter Sunk Mode to 0, you can define Counter Sunk Depth and Counter Sunk Angle.
- If you set Counter Sunk Mode to 1, you can define Counter Sunk Diameter and Counter Sunk Depth.
- If you set Counter Sunk Mode to 2, you can define Counter Sunk Diameter and Counter Sunk Angle.
- Notes:
- Counter Sunk Diameter: Mandatory
- Counter Sunk Depth: Mandatory
- Counter Sunk Angle: Mandatory
- Main Hole Depth: Optional
- Bottom Angle: Optional
- Thread Diameter: Optional
- Thread Depth: Optional
- Pitch: Optional
- Thread Description: Optional
| Mandatory | Mandatory | Mandatory | Mandatory | Mandatory | Mandatory | Optional | Optional | Optional | Optional |
| Name | MainDiameter | Mode | CounterSunkDepth | CounterSunkAngle | CounterSunkDiameter | BottomAngle | ThreadDiameter | Pitch | ThreadDescription |
Create a New XML file and paste this XML content into the new file, and save it to the CounterSunkHole directory.
<?xml version="1.0" ?>
<std:node name="CS1_standard" xmlns:std="http://www.dsweb.com/std">
	<std:node name="Units">
		<std:node name="Length">
			<std:strval name="Length">mm</std:strval>
		</std:node>
		<std:node name="Angle">
			<std:strval name="Angle">deg</std:strval>
		</std:node>
	</std:node>
	<std:typedef name="CounterSunkHoleValues">
		<std:strval name="Name">CS1</std:strval>
		<std:floatval name="MainDiameter">5.0</std:floatval>
		<std:intval name="Mode">0</std:intval>
		<std:floatval name="CounterSunkDepth">5.0</std:floatval>
		<std:floatval name="CounterSunkAngle">90.0</std:floatval>
		<std:floatval name="CounterSunkDiameter">0.0</std:floatval>
		<std:floatval name="BottomAngle">120.0</std:floatval>
		<std:floatval name="ThreadDiameter">6.0</std:floatval>
		<std:floatval name="Pitch">1.0</std:floatval>
		<std:strval name="ThreadDescription">THD_CS_1</std:strval>
	</std:typedef>
	<std:node name="CounterSunkHoleValues">
		<std:typeval name="CounterSunkHoleValues">
			<std:strval name="Name">CS1</std:strval>
			<std:floatval name="MainDiameter">5.0</std:floatval>
			<std:intval name="Mode">0</std:intval>
			<std:floatval name="CounterSunkDepth">5.0</std:floatval>
			<std:floatval name="CounterSunkAngle">90.0</std:floatval>
			<std:floatval name="CounterSunkDiameter">0.0</std:floatval>
			<std:floatval name="BottomAngle">120.0</std:floatval>
			<std:floatval name="ThreadDiameter">6.0</std:floatval>
			<std:floatval name="Pitch">1.0</std:floatval>
			<std:strval name="ThreadDescription">THD_CS_1</std:strval>
		</std:typeval>
		<std:typeval name="CounterSunkHoleValues">
			<std:strval name="Name">STD_CS_2</std:strval>
			<std:floatval name="MainDiameter">6.0</std:floatval>
			<std:floatval name="MainDepth">12.</std:floatval>
			<std:intval name="Mode">0</std:intval>
			<std:floatval name="CounterSunkDepth">6.0</std:floatval>
			<std:floatval name="CounterSunkAngle">85.0</std:floatval>
			<std:floatval name="CounterSunkDiameter">0.0</std:floatval>
			<std:floatval name="BottomAngle">115.0</std:floatval>
			<std:floatval name="ThreadDiameter">7.0</std:floatval>
			<std:floatval name="ThreadDepth">10.</std:floatval>
			<std:floatval name="Pitch">1.05</std:floatval>
			<std:strval name="ThreadDescription">THD_CS_2</std:strval>
		</std:typeval>
	</std:node>
</std:node>
Counterdrilled Hole
- Description of the standard: Mandatory
- Main Hole diameter: Mandatory
- Mode: Mandatory
- Notes:
- If you set Mode to 0, you cannot define Counter Sunk Diameter.
- If you set Mode to 1, you can define Counter Sunk Diameter.
- Notes:
- Counter Drilled Diameter: Mandatory
- Counter Drilled Depth: Mandatory
- Counter Drilled Angle: Mandatory
- Counter Sunk Diameter: Mandatory
- Main Hole Depth: Optional
- Bottom Angle: Optional
- Thread Diameter: Optional
- Thread Depth: Optional
- Pitch: Optional
- Thread Description: Optional
Create a New XML file and paste this XML content into the new file, and save it to the CounterDrilledHole directory.
<?xml version="1.0" ?>
<std:node name="CD1_standard" xmlns:std="http://www.dsweb.com/std">
	<std:node name="Units">
		<std:node name="Length">
			<std:strval name="Length">mm</std:strval>
		</std:node>
		<std:node name="Angle">
			<std:strval name="Angle">deg</std:strval>
		</std:node>
	</std:node>
	<std:typedef name="CounterDrilledHoleValues">
		<std:strval name="Name">CD1</std:strval>
		<std:floatval name="MainDiameter">5.0</std:floatval>
		<std:intval name="Mode">0</std:intval>
		<std:floatval name="CounterDrilledDiameter">10.0</std:floatval>
		<std:floatval name="CounterDrilledDepth">5.0</std:floatval>
		<std:floatval name="CounterDrilledAngle">90.0</std:floatval>
		<std:floatval name="CounterSunkDiameter">0.0</std:floatval>
		<std:floatval name="BottomAngle">120.0</std:floatval>
		<std:floatval name="ThreadDiameter">6.0</std:floatval>
		<std:floatval name="Pitch">1.0</std:floatval>
		<std:strval name="ThreadDescription">THD_CD_1</std:strval>
	</std:typedef>
	<std:node name="CounterDrilledHoleValues">
		<std:typeval name="CounterDrilledHoleValues">
			<std:strval name="Name">CD1</std:strval>
			<std:floatval name="MainDiameter">5.0</std:floatval>
			<std:intval name="Mode">0</std:intval>
			<std:floatval name="CounterDrilledDiameter">10.0</std:floatval>
			<std:floatval name="CounterDrilledDepth">5.0</std:floatval>
			<std:floatval name="CounterDrilledAngle">90.0</std:floatval>
			<std:floatval name="CounterSunkDiameter">0.0</std:floatval>
			<std:floatval name="BottomAngle">120.0</std:floatval>
			<std:floatval name="ThreadDiameter">6.0</std:floatval>
			<std:floatval name="Pitch">1.0</std:floatval>
			<std:strval name="ThreadDescription">THD_CD_1</std:strval>
		</std:typeval>
		<std:typeval name="CounterDrilledHoleValues">
			<std:strval name="Name">STD_CD_2</std:strval>
			<std:floatval name="MainDiameter">6.0</std:floatval>
			<std:floatval name="MainDepth">12.</std:floatval>
			<std:floatval name="CounterDrilledDiameter">11.0</std:floatval>
			<std:floatval name="CounterDrilledDepth">5.0</std:floatval>
			<std:floatval name="CounterDrilledAngle">85.0</std:floatval>
			<std:floatval name="BottomAngle">115.0</std:floatval>
			<std:floatval name="ThreadDiameter">7.0</std:floatval>
			<std:floatval name="ThreadDepth">10.</std:floatval>
			<std:floatval name="Pitch">1.05</std:floatval>
			<std:strval name="ThreadDescription">THD_CD_2</std:strval>
		</std:typeval>
	</std:node>
</std:node>
Counterbored Hole
- Description of the standard: Mandatory
- Main Hole diameter: Mandatory
- Counter Bored Diameter: Mandatory
- Counter Bored Depth: Mandatory
- Main Hole Depth: Optional
- Bottom Angle: Optional
- Thread Diameter: Optional
- Thread Depth: Optional
- Pitch: Optional
- Thread Description: Optional
Create a New XML file and paste this XML content into the new file, and save it to the CounterBoredHole directory.
<?xml version="1.0" ?>
<std:node name="CB1_standard" xmlns:std="http://www.dsweb.com/std">
	<std:node name="Units">
		<std:node name="Length">
			<std:strval name="Length">mm</std:strval>
		</std:node>
		<std:node name="Angle">
			<std:strval name="Angle">deg</std:strval>
		</std:node>
	</std:node>
	<std:typedef name="CounterBoredHoleValues">
		<std:strval name="Name">CB1</std:strval>
		<std:floatval name="MainDiameter">5.0</std:floatval>
		<std:floatval name="CounterBoredDiameter">10.0</std:floatval>
		<std:floatval name="CounterBoredDepth">5.0</std:floatval>
		<std:floatval name="BottomAngle">120.0</std:floatval>
		<std:floatval name="ThreadDiameter">6.0</std:floatval>
		<std:floatval name="Pitch">1.0</std:floatval>
		<std:strval name="ThreadDescription">THD_CB_01</std:strval>
	</std:typedef>
	<std:node name="CounterBoredHoleValues">
		<std:typeval name="CounterBoredHoleValues">
			<std:strval name="Name">CB1</std:strval>
			<std:floatval name="MainDiameter">5.0</std:floatval>
			<std:floatval name="CounterBoredDiameter">10.0</std:floatval>
			<std:floatval name="CounterBoredDepth">5.0</std:floatval>
			<std:floatval name="BottomAngle">115.0</std:floatval>
			<std:floatval name="ThreadDiameter">6.0</std:floatval>
			<std:floatval name="Pitch">1.0</std:floatval>
			<std:strval name="ThreadDescription">THD_CB_01</std:strval>
		</std:typeval>
		<std:typeval name="CounterBoredHoleValues">
			<std:strval name="Name">STD_CB_2</std:strval>
			<std:floatval name="MainDiameter">6.0</std:floatval>
			<std:floatval name="MainDepth">15.</std:floatval>
			<std:floatval name="CounterBoredDiameter">11.0</std:floatval>
			<std:floatval name="CounterBoredDepth">5.0</std:floatval>
			<std:floatval name="BottomAngle">110.0</std:floatval>
			<std:floatval name="ThreadDiameter">7.0</std:floatval>
			<std:floatval name="ThreadDepth">10.</std:floatval>
			<std:floatval name="Pitch">1.05</std:floatval>
			<std:strval name="ThreadDescription">THD_CB_02</std:strval>
		</std:typeval>
	</std:node>
</std:node>
XML File Structure
Within the XML File Structure is comprised of three chunks;
- Units
- Type Definition
- Type Value
Units
This section defines the used Units within the Type Definition
	<std:node name="Units">
		<std:node name="Length">
			<std:strval name="Length">mm</std:strval>
		</std:node>
		<std:node name="Angle">
			<std:strval name="Angle">deg</std:strval>
		</std:node>
	</std:node>
Type Definition
This section defines the structure of the Hole Type and the Attributes that can be Valuated within the XML file. I would recommend setting all of the values to 0.0 for the Float Values, 0 for the Int Values and set the Name and Description to Base<HoleType> i.e., BaseCounterDrilledHole, so you don’t confuse this with an actual set of values for a specific hole type.
<std:typedef name="CounterDrilledHoleValues">
		<std:strval name="Name">BaseCounterDrilledHole</std:strval>
		<std:floatval name="MainDiameter">0.0</std:floatval>
		<std:intval name="Mode">0</std:intval>
		<std:floatval name="CounterDrilledDiameter">0.0</std:floatval>
		<std:floatval name="CounterDrilledDepth">0.0</std:floatval>
		<std:floatval name="CounterDrilledAngle">0.0</std:floatval>
		<std:floatval name="CounterSunkDiameter">0.0</std:floatval>
		<std:floatval name="BottomAngle">0.0</std:floatval>
		<std:floatval name="ThreadDiameter">0.0</std:floatval>
		<std:floatval name="Pitch">0.0</std:floatval>
		<std:strval name="ThreadDescription">BaseCounterDrilledHole</std:strval>
	</std:typedef>
Type Value
The last section contains the individual Hole definitions, the Name attribute must be unique, I would recommend starting with Sample1 and Sample2 to get used to how this file works with the Hole function.
		<std:typeval name="CounterDrilledHoleValues">
			<std:strval name="Name">Sample1</std:strval>
			<std:floatval name="MainDiameter">5.0</std:floatval>
			<std:intval name="Mode">0</std:intval>
			<std:floatval name="CounterDrilledDiameter">10.0</std:floatval>
			<std:floatval name="CounterDrilledDepth">5.0</std:floatval>
			<std:floatval name="CounterDrilledAngle">90.0</std:floatval>
			<std:floatval name="CounterSunkDiameter">0.0</std:floatval>
			<std:floatval name="BottomAngle">120.0</std:floatval>
			<std:floatval name="ThreadDiameter">6.0</std:floatval>
			<std:floatval name="Pitch">1.0</std:floatval>
			<std:strval name="ThreadDescription">Sample1</std:strval>
		</std:typeval>
		<std:typeval name="CounterDrilledHoleValues">
			<std:strval name="Name">Sample2</std:strval>
			<std:floatval name="MainDiameter">6.0</std:floatval>
			<std:floatval name="MainDepth">12.</std:floatval>
			<std:floatval name="CounterDrilledDiameter">11.0</std:floatval>
			<std:floatval name="CounterDrilledDepth">5.0</std:floatval>
			<std:floatval name="CounterDrilledAngle">85.0</std:floatval>
			<std:floatval name="BottomAngle">115.0</std:floatval>
			<std:floatval name="ThreadDiameter">7.0</std:floatval>
			<std:floatval name="ThreadDepth">10.</std:floatval>
			<std:floatval name="Pitch">1.05</std:floatval>
			<std:strval name="ThreadDescription">Sample2</std:strval>
		</std:typeval>
Managing XML File Change
You can edit the XML file in two ways;
- XML File Direct Edit
- XML File Edition Through the Standards Interface
XML File Direct Edit
The XML file can be directly edited with a tool such as ‘NotePad++‘, without restarting CATIA. As long as the either the Hole Type is Changed and then changed back or the Standard set to No Standard or another Standard and then set back the Standard will update in the session post XML changes once the file is saved.
XML File Edition Through the Standards Interface
Its important to note that if the ‘CollectionStandard‘ environment variable is pointed to a different directory than the <Installation>\resources\standard folder then once any edition is made a copy of the new file will be created in the ‘CollectionStandard‘ folder. When a duplicate file is found in the ‘CollectionStandard‘ folder this file is used by default.
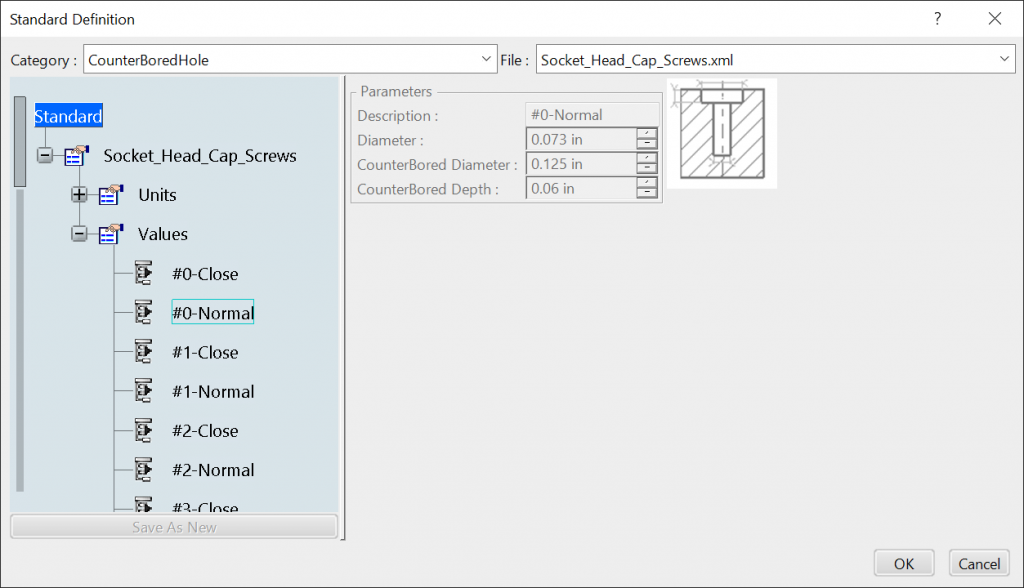
To use the Standards Interface you must have ‘Leader‘ access. Then from the top right hand corner within the thick client select Preferences->Standards to open the Standards Editor. In the top left-hand dropdown select the Category and then select the XML file to edit.
Serializing and Deserializing the XML Files in C#
The following code will allow you to Deserialize the Standard Hole XML files into a class structure defined by the classes shown below. We can then add additional Standard Hole definitions and re-serialize the XML file again.
			string text;
            using (var streamReader = new StreamReader(@"C:\Users\ma_je\Desktop\Hole.xml", Encoding.UTF8))
            {
                text = streamReader.ReadToEnd();
            }

            Node? test = null;

            XmlSerializer serializer = new XmlSerializer(typeof(Node));
            using (StringReader reader = new StringReader(text))
            {
                test = (Node)serializer.Deserialize(reader);
            }
XML Classes
Node
using System.Collections.Generic;
using System.Xml.Serialization;

namespace catiaholexmlpassing.Models.XML
{
	[XmlRoot(ElementName = "node",Namespace = "http://www.dsweb.com/std")]
	public class Node
	{
		[XmlElement(ElementName = "strval")]
		public Strval? Strval { get; set; } = null;

		[XmlAttribute(AttributeName = "name")]
		public string Name { get; set; } = string.Empty;

		[XmlText]
		public string Text { get; set; } = string.Empty;

		[XmlElement(ElementName = "node")]
		public List<Node>? NodeList { get; set; } = new List<Node>() { };

		[XmlElement(ElementName = "typeval")]
		public List<Typeval>? Typeval { get; set; } = new List<Typeval>() { };

		[XmlElement(ElementName = "typedef")]
		public Typedef? Typedef { get; set; } = null;

		[XmlAttribute(AttributeName = "std")]
		public string Std { get; set; } = string.Empty;

		public void AddTypeval(Typeval typeval)
		{
			if (Typeval == null) {Typeval = new List<Typeval>() { };}
			Typeval.Add(typeval);
		}
	}
}
Typedef
using System.Collections.Generic;
using System.Xml.Serialization;

namespace catiaholexmlpassing.Models.XML
{
	[XmlRoot(ElementName = "typedef", Namespace = "http://www.dsweb.com/std")]
	public class Typedef
	{

		[XmlElement(ElementName = "strval")]
		public List<Strval>? Strval { get; set; } = new List<Strval>() { };

		[XmlElement(ElementName = "floatval")]
		public List<Floatval>? Floatval { get; set; } = new List<Floatval>() { };

		[XmlAttribute(AttributeName = "name")]
		public string Name { get; set; } = string.Empty;

		[XmlText]
		public string Text { get; set; } = string.Empty;
	}
}
Typeval
using System.Collections.Generic;
using System.Xml.Serialization;

namespace catiaholexmlpassing.Models.XML
{
	[XmlRoot(ElementName = "typeval", Namespace = "http://www.dsweb.com/std")]
	public class Typeval
	{
		[XmlElement(ElementName = "strval")]
		public List<Strval>? Strval { get; set; } = new List<Strval>() { };

		[XmlElement(ElementName = "floatval")]
		public List<Floatval>? Floatval { get; set; } = new List<Floatval>() { };

		[XmlAttribute(AttributeName = "name")]
		public string Name { get; set; } = string.Empty;

		[XmlText]
		public string Text { get; set; }=string.Empty;
	}
}
Floatval
using System.Xml.Serialization;

namespace catiaholexmlpassing.Models.XML
{
	[XmlRoot(ElementName = "floatval", Namespace = "http://www.dsweb.com/std")]
	public class Floatval
	{

		[XmlAttribute(AttributeName = "name")]
		public string Name { get; set; } = string.Empty;

		[XmlText]
		public double Text { get; set; } = 0;

      	public Floatval() { }
		public Floatval(string name,double text)
        {
			Name = name;
			Text = text;
        }
	}
}
Strval
using System;
using System.Xml.Serialization;

namespace catiaholexmlpassing.Models.XML
{
	[XmlRoot(ElementName = "strval", Namespace = "http://www.dsweb.com/std")]
	public class Strval
	{

		[XmlAttribute(AttributeName = "name")]
		public string Name { get; set; } = String.Empty;

		[XmlText]
		public string Text { get; set; } = String.Empty;

      	public Strval() { }
		public Strval(string name, string text)
        {
			Name = name;
			Text = text;
        }
	}
}
ViewModels
Eventually we will ahve a Nice User Interface where we can create new Standard Holes to do that we will need View Models, the following classes represent the required View Models.
Abstract Hole View Model
namespace catiaholexmlpassing.Models.ViewModels
{
    public abstract class AbstractHole
    {
        // Manditory
        public string Name { get; set; } = string.Empty;
        // Manditory
        public double MainDiameter { get; set; } = 10;
    }
}
Simple Hole View Model
using catiaholexmlpassing.Models.XML;
using System;
using System.Collections.Generic;

namespace catiaholexmlpassing.Models.ViewModels
{
    public class SimpleHole : AbstractHole
    {
        // Optional
        public double MainDepth { get; set; } = 0;
        // Optional
        public double BottomAngle { get; set; } = 0;
        // Optional
        public double ThreadDiameter { get; set; } = 0;
        // Optional
        public double ThreadDepth { get; set; } = 0;
        // Optional
        public double Pitch { get; set; } = 0;
        // Optional
        public string ThreadDescription { get; set; } = "NA";

        public Typeval typeval
        {
            get
            {
                Typeval returnTypeval = new Typeval();

                returnTypeval.Strval = returnTypeval.Strval ?? new List<Strval>() { };
                returnTypeval.Floatval = returnTypeval.Floatval ?? new List<Floatval>() { };

                if (ThreadDescription != string.Empty)
                {
                    returnTypeval.Strval.Add(new Strval(nameof(Name), Name));
                } else {
                    throw new Exception("Manditory Value Required."); }

                if (ThreadDescription != "NA") { returnTypeval.Strval.Add(new Strval( nameof(ThreadDescription), ThreadDescription)); }

                if (MainDiameter != 0) {
                    returnTypeval.Floatval.Add(new Floatval(nameof(MainDiameter), MainDiameter));
                } else {
                    throw new Exception("Manditory Value Required."); }

                if (MainDepth != 0) { returnTypeval.Floatval.Add(new Floatval(nameof(MainDepth), MainDepth)); }
                if (BottomAngle != 0) { returnTypeval.Floatval.Add(new Floatval(nameof(BottomAngle), BottomAngle)); }
                if (ThreadDiameter != 0) { returnTypeval.Floatval.Add(new Floatval(nameof(ThreadDiameter), ThreadDiameter)); }
                if (Pitch != 0) { returnTypeval.Floatval.Add(new Floatval(nameof(Pitch), Pitch)); }

                return returnTypeval;
            }
        }

        public SimpleHole(Typeval typeval)
        {
            Strval? strval = (from x in typeval.Strval where x.Name == "Name" select x).FirstOrDefault() ?? null;
            if(strval != null) { Name = strval.Text; }

            strval = (from x in typeval.Strval where x.Name == "ThreadDescription" select x).FirstOrDefault() ?? null;
            if (strval != null) { Name = strval.Text; }

            Floatval? floatval = (from x in typeval.Floatval where x.Name == "MainDiameter" select x).FirstOrDefault() ?? null;
            if (floatval != null) { MainDiameter = floatval.Text; }

            floatval = (from x in typeval.Floatval where x.Name == "MainDepth" select x).FirstOrDefault() ?? null;
            if (floatval != null) { MainDepth = floatval.Text; }

            floatval = (from x in typeval.Floatval where x.Name == "BottomAngle" select x).FirstOrDefault() ?? null;
            if (floatval != null) { BottomAngle = floatval.Text; }

            floatval = (from x in typeval.Floatval where x.Name == "ThreadDiameter" select x).FirstOrDefault() ?? null;
            if (floatval != null) { ThreadDiameter = floatval.Text; }

            floatval = (from x in typeval.Floatval where x.Name == "ThreadDepth" select x).FirstOrDefault() ?? null;
            if (floatval != null) { ThreadDepth = floatval.Text; }

            floatval = (from x in typeval.Floatval where x.Name == "Pitch" select x).FirstOrDefault() ?? null;
            if (floatval != null) { Pitch = floatval.Text; }
        }
    }
}
Tappered Hole View Model
using catiaholexmlpassing.Models.XML;
using System;
using System.Collections.Generic;
using System.Linq;

namespace catiaholexmlpassing.Models.ViewModels
{
    public class TapperedHole : AbstractHole
    {
        // Mandatory
        public double MainDepth { get; set; } = 5;
        // Mandatory
        public double TaperedAngle { get; set; } = 25;
        // Optional
        public int AnchorPoint { get; set; } = -1;
        // Optional
        public double BottomAngle { get; set; } = 0;
        // Optional
        public double ThreadDiameter { get; set; } = 0;
        // Optional
        public double ThreadDepth { get; set; } = 0;
        // Optional
        public double Pitch { get; set; } = 0;
        // Optional
        public string ThreadDescription { get; set; } = "NA";

        public override Typeval typeval
        {
            get
            {
                Typeval returnTypeval = new Typeval();

                returnTypeval.Strval = returnTypeval.Strval ?? new List<Strval>() { };
                returnTypeval.Floatval = returnTypeval.Floatval ?? new List<Floatval>() { };

                if (ThreadDescription != string.Empty)
                {
                    returnTypeval.Strval.Add(new Strval(nameof(Name), Name));
                }
                else
                {
                    throw new Exception("Manditory Value Required.");
                }

                if (ThreadDescription != "NA") { returnTypeval.Strval.Add(new Strval(nameof(ThreadDescription), ThreadDescription)); }


                if (MainDiameter != 0) {
                    returnTypeval.Floatval.Add(new Floatval(nameof(MainDiameter), MainDiameter)); }
                else {
                    throw new Exception("Manditory Value Required.");}


                if (MainDepth != 0) {
                    returnTypeval.Floatval.Add(new Floatval(nameof(MainDepth), MainDepth)); }
                else {
                    throw new Exception("Manditory Value Required.");}

                if (TaperedAngle != 0) {
                    returnTypeval.Floatval.Add(new Floatval(nameof(TaperedAngle), TaperedAngle)); }
                else {
                    throw new Exception("Manditory Value Required.");}

                if (AnchorPoint != -1) { returnTypeval.Floatval.Add(new Floatval(nameof(AnchorPoint), AnchorPoint)); }
                if (BottomAngle != 0) { returnTypeval.Floatval.Add(new Floatval(nameof(BottomAngle), BottomAngle)); }
                if (ThreadDiameter != 0) { returnTypeval.Floatval.Add(new Floatval(nameof(ThreadDiameter), ThreadDiameter)); }
                if (ThreadDepth != 0) { returnTypeval.Floatval.Add(new Floatval(nameof(ThreadDepth), ThreadDepth)); }
                if (Pitch != 0) { returnTypeval.Floatval.Add(new Floatval(nameof(Pitch), Pitch)); }

                return returnTypeval;
            }
        }

        public TapperedHole(Typeval typeval)
        {
            Strval? strval = (from x in typeval.Strval where x.Name == "Name" select x).FirstOrDefault() ?? null;
            if (strval != null) { Name = strval.Text; }

            strval = (from x in typeval.Strval where x.Name == "ThreadDescription" select x).FirstOrDefault() ?? null;
            if (strval != null) { Name = strval.Text; }

            Floatval? floatval = (from x in typeval.Floatval where x.Name == "MainDiameter" select x).FirstOrDefault() ?? null;
            if (floatval != null) { MainDiameter = floatval.Text; }

            floatval = (from x in typeval.Floatval where x.Name == "MainDepth" select x).FirstOrDefault() ?? null;
            if (floatval != null) { MainDepth = floatval.Text; }

            floatval = (from x in typeval.Floatval where x.Name == "TaperedAngle" select x).FirstOrDefault() ?? null;
            if (floatval != null) { TaperedAngle = floatval.Text; }

            floatval = (from x in typeval.Floatval where x.Name == "AnchorPoint" select x).FirstOrDefault() ?? null;
            if (floatval != null) { AnchorPoint = ((int)floatval.Text); }

            floatval = (from x in typeval.Floatval where x.Name == "BottomAngle" select x).FirstOrDefault() ?? null;
            if (floatval != null) { BottomAngle = floatval.Text; }

            floatval = (from x in typeval.Floatval where x.Name == "ThreadDiameter" select x).FirstOrDefault() ?? null;
            if (floatval != null) { ThreadDiameter = floatval.Text; }

            floatval = (from x in typeval.Floatval where x.Name == "ThreadDepth" select x).FirstOrDefault() ?? null;
            if (floatval != null) { ThreadDepth = floatval.Text; }

            floatval = (from x in typeval.Floatval where x.Name == "Pitch" select x).FirstOrDefault() ?? null;
            if (floatval != null) { Pitch = floatval.Text; }
        }
    }
}
Counter Sunk Hole View Model
using catiaholexmlpassing.Models.XML;
using System;
using System.Collections.Generic;
using System.Linq;

namespace catiaholexmlpassing.Models.ViewModels
{
    public class CounterSunkHole : AbstractHole
    {
        // Mandatory
        public int Mode { get; set; } = -1;
        // Mandatory
        public double CounterSunkDepth { get; set; } = 0;
        // Mandatory
        public double CounterSunkAngle { get; set; } = 0;
        // Mandatory
        public double CounterSunkDiameter { get; set; } = 0;
        // Optional
        public double BottomAngle { get; set; } = 0;
        // Optional
        public double ThreadDiameter { get; set; } = 0;
        // Optional
        public double Pitch { get; set; } = 0;
        // Optional
        public string ThreadDescription { get; set; } = "NA";

        public override Typeval typeval
        {
            get
            {
                Typeval returnTypeval = new Typeval();

                returnTypeval.Strval = returnTypeval.Strval ?? new List<Strval>() { };
                returnTypeval.Floatval = returnTypeval.Floatval ?? new List<Floatval>() { };

                if (ThreadDescription != string.Empty) {
                    returnTypeval.Strval.Add(new Strval(nameof(Name), Name)); }
                else {
                    throw new Exception("Manditory Value Required.");}

                if (ThreadDescription != "NA") { returnTypeval.Strval.Add(new Strval(nameof(ThreadDescription), ThreadDescription)); }


                if (MainDiameter != 0) {
                    returnTypeval.Floatval.Add(new Floatval(nameof(MainDiameter), MainDiameter));}
                else {
                    throw new Exception("Manditory Value Required."); }


                if (Mode != -1) {
                    returnTypeval.Floatval.Add(new Floatval(nameof(Mode), Mode)); }
                else {
                    throw new Exception("Manditory Value Required."); }

                if (CounterSunkDepth != 0) {
                    returnTypeval.Floatval.Add(new Floatval(nameof(CounterSunkDepth), CounterSunkDepth)); }
                else {
                    throw new Exception("Manditory Value Required.");}

                if (CounterSunkAngle != 0) {
                    returnTypeval.Floatval.Add(new Floatval(nameof(CounterSunkAngle), CounterSunkAngle)); }
                else {
                    throw new Exception("Manditory Value Required."); }

                if (CounterSunkDiameter != 0) {
                    returnTypeval.Floatval.Add(new Floatval(nameof(CounterSunkDiameter), CounterSunkDiameter)); }
                else {
                    throw new Exception("Manditory Value Required."); }

                if (BottomAngle != 0) { returnTypeval.Floatval.Add(new Floatval(nameof(BottomAngle), BottomAngle)); }
                if (ThreadDiameter != 0) { returnTypeval.Floatval.Add(new Floatval(nameof(ThreadDiameter), ThreadDiameter)); }
                if (Pitch != 0) { returnTypeval.Floatval.Add(new Floatval(nameof(Pitch), Pitch)); }

                return returnTypeval;
            }
        }

        public CounterSunkHole(Typeval typeval)
        {
            Strval? strval = (from x in typeval.Strval where x.Name == "Name" select x).FirstOrDefault() ?? null;
            if (strval != null) { Name = strval.Text; }

            strval = (from x in typeval.Strval where x.Name == "ThreadDescription" select x).FirstOrDefault() ?? null;
            if (strval != null) { Name = strval.Text; }

            Floatval? floatval = (from x in typeval.Floatval where x.Name == "MainDiameter" select x).FirstOrDefault() ?? null;
            if (floatval != null) { MainDiameter = floatval.Text; }

            floatval = (from x in typeval.Floatval where x.Name == "Mode" select x).FirstOrDefault() ?? null;
            if (floatval != null) { Mode = (int)floatval.Text; }

            floatval = (from x in typeval.Floatval where x.Name == "CounterSunkDepth" select x).FirstOrDefault() ?? null;
            if (floatval != null) { CounterSunkDepth = floatval.Text; }

            floatval = (from x in typeval.Floatval where x.Name == "CounterSunkAngle" select x).FirstOrDefault() ?? null;
            if (floatval != null) { CounterSunkAngle = ((int)floatval.Text); }

            floatval = (from x in typeval.Floatval where x.Name == "CounterSunkDiameter" select x).FirstOrDefault() ?? null;
            if (floatval != null) { CounterSunkDiameter = ((int)floatval.Text); }

            floatval = (from x in typeval.Floatval where x.Name == "BottomAngle" select x).FirstOrDefault() ?? null;
            if (floatval != null) { BottomAngle = floatval.Text; }

            floatval = (from x in typeval.Floatval where x.Name == "ThreadDiameter" select x).FirstOrDefault() ?? null;
            if (floatval != null) { ThreadDiameter = floatval.Text; }

            floatval = (from x in typeval.Floatval where x.Name == "Pitch" select x).FirstOrDefault() ?? null;
            if (floatval != null) { Pitch = floatval.Text; }
        }
    }
}
Counter Drilled Hole View Model
using catiaholexmlpassing.Models.XML;
using System;
using System.Collections.Generic;
using System.Linq;

namespace catiaholexmlpassing.Models.ViewModels
{
    public class CounterDrilledHole : AbstractHole
    {
        // Mandatory
        public int Mode { get; set; } = -1;
        // Mandatory
        public double CounterDrilledDiameter { get; set; } = 0;
        // Mandatory
        public double CounterDrilledDepth { get; set; } = 0;
        // Mandatory
        public double CounterDrilledAngle { get; set; } = 0;
        // Mandatory
        public double CounterSunkDiameter { get; set; } = 0;
        // Optional
        public double MainHoleDepth { get; set; } = 0;
        // Optional
        public double BottomAngle { get; set; } = 0;
        // Optional
        public double ThreadDiameter { get; set; } = 0;
        // Optional
        public double ThreadDepth { get; set; } = 0;
        // Optional
        public double Pitch { get; set; } = 0;
        // Optional
        public string ThreadDescription { get; set; } = "NA";

        public override Typeval typeval
        {
            get
            {
                Typeval returnTypeval = new Typeval();

                returnTypeval.Strval = returnTypeval.Strval ?? new List<Strval>() { };
                returnTypeval.Floatval = returnTypeval.Floatval ?? new List<Floatval>() { };

                if (ThreadDescription != string.Empty) {
                    returnTypeval.Strval.Add(new Strval(nameof(Name), Name)); }
                else {
                    throw new Exception("Manditory Value Required."); }

                if (ThreadDescription != "NA") { returnTypeval.Strval.Add(new Strval(nameof(ThreadDescription), ThreadDescription)); }

                if (MainDiameter != 0) {
                    returnTypeval.Floatval.Add(new Floatval(nameof(MainDiameter), MainDiameter)); }
                else {
                    throw new Exception("Manditory Value Required."); }

                if (Mode != -1) {
                    returnTypeval.Floatval.Add(new Floatval(nameof(Mode), Mode)); }
                else {
                    throw new Exception("Manditory Value Required."); }

                if (CounterDrilledDiameter != 0) {
                    returnTypeval.Floatval.Add(new Floatval(nameof(CounterDrilledDiameter), CounterDrilledDiameter)); }
                else {
                    throw new Exception("Manditory Value Required."); }

                if (CounterDrilledDepth != 0) {
                    returnTypeval.Floatval.Add(new Floatval(nameof(CounterDrilledDepth), CounterDrilledDepth)); }
                else {
                    throw new Exception("Manditory Value Required."); }

                if (CounterDrilledAngle != 0) {
                    returnTypeval.Floatval.Add(new Floatval(nameof(CounterDrilledAngle), CounterDrilledAngle)); }
                else {
                    throw new Exception("Manditory Value Required."); }

                if (CounterSunkDiameter != 0) {
                    returnTypeval.Floatval.Add(new Floatval(nameof(CounterSunkDiameter), CounterSunkDiameter)); }
                else {
                    throw new Exception("Manditory Value Required."); }

                if (MainHoleDepth != 0){ returnTypeval.Floatval.Add(new Floatval(nameof(MainHoleDepth), MainHoleDepth));}
                if (BottomAngle != 0) { returnTypeval.Floatval.Add(new Floatval(nameof(BottomAngle), BottomAngle)); }
                if (ThreadDiameter != 0) { returnTypeval.Floatval.Add(new Floatval(nameof(ThreadDiameter), ThreadDiameter)); }
                if (ThreadDepth != 0) { returnTypeval.Floatval.Add(new Floatval(nameof(ThreadDepth), ThreadDepth)); }
                if (Pitch != 0) { returnTypeval.Floatval.Add(new Floatval(nameof(Pitch), Pitch)); }

                return returnTypeval;
            }
        }

        public CounterDrilledHole(Typeval typeval)
        {
            Strval? strval = (from x in typeval.Strval where x.Name == "Name" select x).FirstOrDefault() ?? null;
            if (strval != null) { Name = strval.Text; }

            strval = (from x in typeval.Strval where x.Name == "ThreadDescription" select x).FirstOrDefault() ?? null;
            if (strval != null) { Name = strval.Text; }

            Floatval? floatval = (from x in typeval.Floatval where x.Name == "MainDiameter" select x).FirstOrDefault() ?? null;
            if (floatval != null) { MainDiameter = floatval.Text; }

            floatval = (from x in typeval.Floatval where x.Name == "Mode" select x).FirstOrDefault() ?? null;
            if (floatval != null) { Mode = (int)floatval.Text; }

            floatval = (from x in typeval.Floatval where x.Name == "CounterDrilledDiameter" select x).FirstOrDefault() ?? null;
            if (floatval != null) { CounterDrilledDiameter = floatval.Text; }

            floatval = (from x in typeval.Floatval where x.Name == "CounterDrilledDepth" select x).FirstOrDefault() ?? null;
            if (floatval != null) { CounterDrilledDepth = ((int)floatval.Text); }

            floatval = (from x in typeval.Floatval where x.Name == "CounterDrilledAngle" select x).FirstOrDefault() ?? null;
            if (floatval != null) { CounterDrilledAngle = ((int)floatval.Text); }

            floatval = (from x in typeval.Floatval where x.Name == "CounterSunkDiameter" select x).FirstOrDefault() ?? null;
            if (floatval != null) { CounterSunkDiameter = ((int)floatval.Text); }

            floatval = (from x in typeval.Floatval where x.Name == "MainHoleDepth" select x).FirstOrDefault() ?? null;
            if (floatval != null) { MainHoleDepth = ((int)floatval.Text); }

            floatval = (from x in typeval.Floatval where x.Name == "BottomAngle" select x).FirstOrDefault() ?? null;
            if (floatval != null) { BottomAngle = floatval.Text; }

            floatval = (from x in typeval.Floatval where x.Name == "ThreadDiameter" select x).FirstOrDefault() ?? null;
            if (floatval != null) { ThreadDiameter = floatval.Text; }

            floatval = (from x in typeval.Floatval where x.Name == "ThreadDepth" select x).FirstOrDefault() ?? null;
            if (floatval != null) { ThreadDepth = floatval.Text; }

            floatval = (from x in typeval.Floatval where x.Name == "Pitch" select x).FirstOrDefault() ?? null;
            if (floatval != null) { Pitch = floatval.Text; }
        }
    }
}
Counter Bored Hole View Model
using catiaholexmlpassing.Models.XML;
using System;
using System.Collections.Generic;
using System.Linq;

namespace catiaholexmlpassing.Models.ViewModels
{
    public class CounterBoredHole : AbstractHole
    {
        // Mandatory
        public double CounterBoredDiameter { get; set; } = 0;
        // Mandatory
        public double CounterBoredDepth { get; set; } = 0;
        // Optional
        public double MainHoleDepth { get; set; } = 0;
        // Optional
        public double BottomAngle { get; set; } = 0;
        // Optional
        public double ThreadDiameter { get; set; } = 0;
        // Optional
        public double ThreadDepth { get; set; } = 0;
        // Optional
        public double Pitch { get; set; } = 0;
        // Optional
        public string ThreadDescription { get; set; } = "NA";

        public override Typeval typeval
        {
            get
            {
                Typeval returnTypeval = new Typeval();

                returnTypeval.Strval = returnTypeval.Strval ?? new List<Strval>() { };
                returnTypeval.Floatval = returnTypeval.Floatval ?? new List<Floatval>() { };

                if (ThreadDescription != string.Empty) {
                    returnTypeval.Strval.Add(new Strval(nameof(Name), Name)); }
                else {
                    throw new Exception("Manditory Value Required."); }

                if (ThreadDescription != "NA") { returnTypeval.Strval.Add(new Strval(nameof(ThreadDescription), ThreadDescription)); }


                if (MainDiameter != 0) {
                    returnTypeval.Floatval.Add(new Floatval(nameof(MainDiameter), MainDiameter)); }
                else {
                    throw new Exception("Manditory Value Required."); }

                if (CounterBoredDiameter != 0) {
                    returnTypeval.Floatval.Add(new Floatval(nameof(CounterBoredDiameter), CounterBoredDiameter)); }
                else {
                    throw new Exception("Manditory Value Required."); }

                if (CounterBoredDepth != 0) {
                    returnTypeval.Floatval.Add(new Floatval(nameof(CounterBoredDepth), CounterBoredDepth)); }
                else {
                    throw new Exception("Manditory Value Required."); }

                if (MainHoleDepth != 0) { returnTypeval.Floatval.Add(new Floatval(nameof(MainHoleDepth), MainHoleDepth)); }
                if (BottomAngle != 0) { returnTypeval.Floatval.Add(new Floatval(nameof(BottomAngle), BottomAngle)); }
                if (ThreadDiameter != 0) { returnTypeval.Floatval.Add(new Floatval(nameof(ThreadDiameter), ThreadDiameter)); }
                if (ThreadDepth != 0) { returnTypeval.Floatval.Add(new Floatval(nameof(ThreadDepth), ThreadDepth)); }
                if (Pitch != 0) { returnTypeval.Floatval.Add(new Floatval(nameof(Pitch), Pitch)); }

                return returnTypeval;
            }
        }

        public CounterBoredHole(Typeval typeval)
        {
            Strval? strval = (from x in typeval.Strval where x.Name == "Name" select x).FirstOrDefault() ?? null;
            if (strval != null) { Name = strval.Text; }

            strval = (from x in typeval.Strval where x.Name == "ThreadDescription" select x).FirstOrDefault() ?? null;
            if (strval != null) { Name = strval.Text; }

            Floatval? floatval = (from x in typeval.Floatval where x.Name == "MainDiameter" select x).FirstOrDefault() ?? null;
            if (floatval != null) { MainDiameter = floatval.Text; }

            floatval = (from x in typeval.Floatval where x.Name == "CounterBoredDiameter" select x).FirstOrDefault() ?? null;
            if (floatval != null) { CounterBoredDiameter = floatval.Text; }

            floatval = (from x in typeval.Floatval where x.Name == "CounterBoredDepth" select x).FirstOrDefault() ?? null;
            if (floatval != null) { CounterBoredDepth = floatval.Text; }

            floatval = (from x in typeval.Floatval where x.Name == "MainHoleDepth" select x).FirstOrDefault() ?? null;
            if (floatval != null) { MainHoleDepth = floatval.Text; }

            floatval = (from x in typeval.Floatval where x.Name == "BottomAngle" select x).FirstOrDefault() ?? null;
            if (floatval != null) { BottomAngle = floatval.Text; }

            floatval = (from x in typeval.Floatval where x.Name == "ThreadDiameter" select x).FirstOrDefault() ?? null;
            if (floatval != null) { ThreadDiameter = floatval.Text; }

            floatval = (from x in typeval.Floatval where x.Name == "ThreadDepth" select x).FirstOrDefault() ?? null;
            if (floatval != null) { ThreadDepth = floatval.Text; }

            floatval = (from x in typeval.Floatval where x.Name == "Pitch" select x).FirstOrDefault() ?? null;
            if (floatval != null) { Pitch = floatval.Text; }
        }
    }
}